QMC: Least known features 1

Access Management for an application can be done with the field in data model itself. This method could be really useful when we want to grant access to large group of people for multiple applications.

We can maintain excel or DB table with the user list, load that as part of data model for all required applications. This user list table can be orphan table as well, need not be linked unless it really makes sense.

Below steps start with this assumption: There is an application containing orphan user list field (UserID) which needs to be distributed.

  1. Create a task for the application as usual, change required is only on “Distribute” tab of Task.
  2. QMC -> Documents -> Source Documents -> Distribute -> Loop Field in Document
  3. Open Document
  4. Select Field “UserID” and Check user identity on “SAM Account Name”.
  5. In Destination section, select appropriate QlikView Server location.
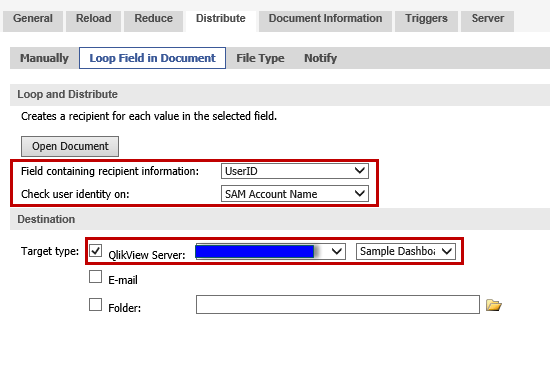
qmc-16. Trigger the job and make sure it is distributed to intended users in User document -> Authorization tab.

Changing QV default selection color without Document Extensions

Settings.ini is setting file for QlikView, it is available for both desktop and server in below respective locations. We need to add couple of lines on this file for overriding the default Selection colors. This file is frequently edited for enabling SSL and creating PGO file as XML.

QlikView Desktop (Close QV desktop before editing Settings.ini)
C;\Users\User_Name\AppData\Roaming\QlikTech\QlikView
QlikView Server  (Restart QV service after editing Settings.ini)
C:\ProgramData\QlikTech\QlikViewServer

Below lines need to be added in Settings.ini file. Here CustSelBgColors1 is used for selected values and CustSelBgColors2 for relevant/related values on different fields.
[Settings 7]
CustSelBgColors1=7777777
CustSelBgColors2=9999999

Finally to apply the new color scheme Open the application and set custom color.
Document Properties -> General -> Selection Appearance -> Color Scheme -> [Custom]

Triggering task on QMC upon file arrival

Basically it’s two step process:

  1. Creating batch file &
  2. Creating ‘External Program’ task on QMC

Taking bottom-up approach for easier understanding/explanation sake.

2. Batch command template and example (used here):

“Batch_File_Path” “Sharepath_to_poll_with_file_format” Idle_time Time_limit_for_polling

“D:\QlikView\QlikView Source Documents\batch\FilePolling.bat” “\\Sharepath\Token\*.txt” 600 20:00

Create ‘External Program’ task on QMC, use above batch template for ‘Command line statement’.

FilePoling1


  1. Batch File code:

REM REM is comment statement in batch file
REM Displaying values passed to the batch file
echo off
echo file_name %1
echo time_polling %2
echo end_time %3

REM Terminate if there are no parameters
if (%1) == () (exit /b 0)

REM This loop will break on two conditions 1. On seeing file 2. Upon time out
:Loop
If exist %1 (exit /b 0)
If %TIME: =0% GTR %3 (exit /b 1)
REM Timeout /T TIME >NUL is sytax. TIME is replaced by second parameter in this code. >NUL means 1>NUL default output 2>NUL default error output. Default output for this code is nothing.
Timeout /T %2 > NUL
Goto Loop

Loading content issue – 1

Suffixed title with 1 because there are so many root causes for “Loading content” issue. This is my second resolution for the same issue but I named my first post different.

2

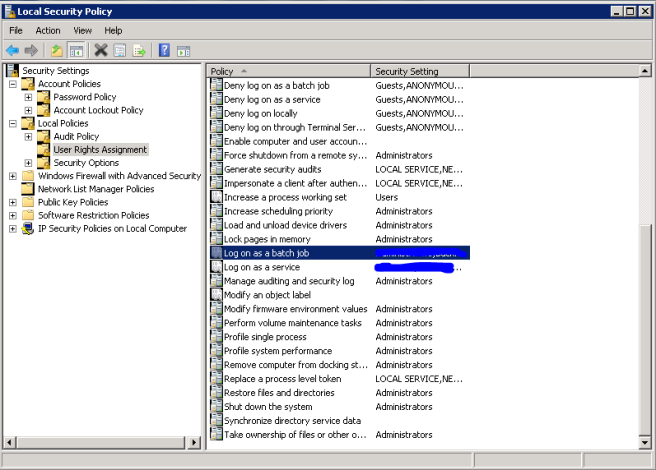
In some companies security restrictions on servers will be very high and that could intersect QlikView servers basic requirement. Pointed out one such thing in below screenshot. Ensure “Log on as a batch job” is enabled for QlikView service account

1

Qlik Tidbit – 1

Generally if you access Data Sources from Control panel on 64-bit OS machine it will open up 64 bit Odbcad.exe which might not be compatible with 32-bit DBs. So if you want to create DSN for 32-bit DB you can use below path to locate Odbcad32.exe.

%systemdrive%\Windows\SysWoW64

One best example of 32-bit DSN name requirement is for Teradata DB.

QlikView SR upgrade

Below snapshot shows the step that I followed for SR upgrading a single box server environment. Same steps can be followed on multiple box environment also, QV installation program will automatically detect the services installed and upgrade that alone.

Note: Upgraded from QV 11.2 SR 5 to QV 11.2 SR 7

1

2

3

4

5

6


8


9

10

11

I didn’t add description since I felt it is self explanatory.

For any clarifications pls. feel free to post your question as comments I will reply asap.

Yet another root cause for “Loading Content Issue”

Generally I prefer bottom-up approach while setting up QV environment so as usual I started with IIS/QVWS service first.

After configuration I was trying to access Accesspoint and consequently prompted by below IE dialog box. From the message it was showing I understood that IE is blocking something.

1Eventually I tried to add localhost to trusted sites but unfortunately couldn’t add because all the options were disabled for me (below snap).

2So I closed both of the dialog boxes then I got “loading content” issue. Till this point my focus was on IE settings but this error message confused me and made me waste my couple of hours in debugging around the issue.

3After ensuring everything in QlikView perspective and turned my attention towards IE. In meantime one idea stuck in mind that is accessing Accesspoint outside server, which worked. So it’s 100% sure that IE setting in server causing the problem, after googling for a while I was able to find out below solution.

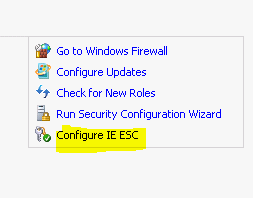
  • Go to Server manager tool
  • Locate “Configure IE ESC” in right hand side pane

4Both options in below screen were enabled but I have to disable for get it working.

5

All set. I was able to access Accesspoint then. J